Fullmark TPICL50 (Made in EU) comes in a black plastic bag containing 50 sheets. Searching the Fullmark website fails to turn up this particular product. In fact Fullmark doesn't seem to carry transparencies anymore (or they haven't updated their website). As with the Joy brand, Fullmark films don't have a paper backing. Price is around USD0.33/sheet.
The last type of film has no brand and has been repacked by the office supply store from which I bought it. This one has a paper backing and is the most expensive at USD0.60/sheet.
Of the three only Joy films produce very good quality printouts. The other two show substantial crazing of the ink. Fullmark is the worst offender. Depending on the printer settings it can border on being useless. Crazing can be detrimental since the cracks allow light to pass through and expose the photosensitive layer of the pcb.
Having found a transparency film that is near optimal I needed to find out what printer settings would provide the most opaque printout and highest ink density. I could've varied the settings and compared the results but fortunately while searching for transparency brands I stumbled upon the recommendations for the JetStar Inkjet Artwork Film:
3. Check printer settings. Make sure printer is set for the highest resolution and print quality, with High Speed Setting OFF. Note that the higher the resolution, the slower the print. Next, set the Media Setting to Matte, Heavyweight Matte, Archival Matte or Inkjet Backlight Film. For Epson Ink Jet Printers, set the Brightness control slider to +25 and although a black print always print in colour Mode. Options will vary based on printer and software available. Then, set ink deposit for optimum results. TIP: Experiment with the setting options available with your printer to determine the best set-up for your requirements. If positive seems light or lacks density, try increasing the print quality or amount of ink deposit. [emphasis added]I tried those settings and it turns out that on the Epson T10 inkjet printer leaving "print in black ink only" unselected and setting all the sliders to maximum (+25) actually gives a better ink density than printing in black only (I used to tick the print in black only option). Here are screenshots showing the settings I now currently use for the T10 .

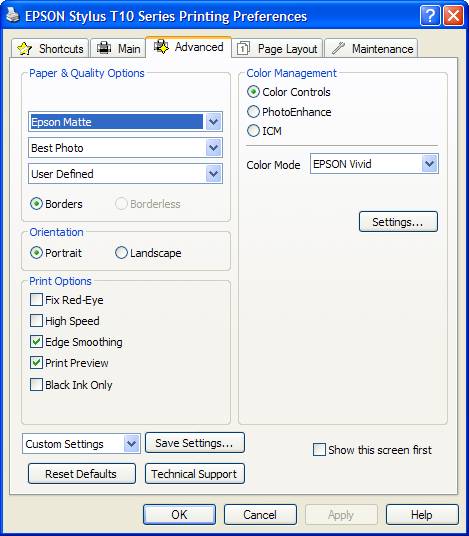

The same settings as in the screenshots:
Advanced
  Paper and Quality Options
    Epson Matte
    Best Photo
    [paper size as required]
  Print Options
    Fix Red-Eye - uncheck
    High Speed - uncheck
    Edge Smoothing - check
    Print Preview - check
    Black Ink Only - uncheck
  Color Management
    Color Controls - select
  Color Mode
    Epson Vivid
    Settings:
      Brightness: +25 (max)
      Contrast: +25 (max)
      Saturation: +25 (max)
      Density: +25 (max)
      Horizontal: 0
      Vertical: 0
awesome. I always like to hear something new about this.. What about the results of its print quality.
ReplyDeleteNot too consistent I'm afraid. Not sure if room temperature and humidity are affecting it.
ReplyDeletetnx for this
ReplyDeleteI read this post your post so nice and very informative post thanks for sharing this post
ReplyDelete